Showing posts with label php. Show all posts

Tuesday, July 12, 2011

Adding WordPress Quicktag Buttons to a WP Plugin

Disclaimer: I am a total noob when it comes to WordPress and WordPress plugins.

I was wondering how difficult it would be to add a button to the WordPress Post Editor. I've seen a few plugins do it, but I discovered that they had to add their own version of TinyMCE to do it.

So I searched around on the internet, and found a few methods. But they either stopped working or required you to edit your quicktags.js file to work, then again after each Wordpress update. So I looked into it and I found a solution that works with the current version 3.2 and hopefully future versions without requiring you to edit or replace the quicktags file.

Before

After

Note: This code is intended to be added inside your WordPress plugin. Like I said, I'm a total noob with WordPress so I'm not sure if it would work outside of a plugin.

CSS - This CSS should be outside of the php tags
<style>
/* Simulate the input buttons styles */
#ed_toolbar button {
 display: inline-block;
 vertical-align: middle;
 margin: 0;
 padding: 0;
 min-width: 26px;
 height: 24px;
 -moz-border-radius: 3px;
 -webkit-border-radius: 3px;
 border-radius: 3px;
 border: #c3c3c3 1px solid;
 background: url() repeat-x;
}
#ed_toolbar button:hover {
 border: #aaa 1px solid;
 background: #ddd;
}
/* toolbar button images in span */
#ed_toolbar button span {
 display: inline-block;
 background: transparent no-repeat center center;
 padding: 4px 2px;
 width: 16px;
 height: 16px;
}

/* toolbar custom button image */
#_custom span {
 background-image: url(/wp-content/plugins/my-plugin-directory/my-plugin-icon.png);
}
</style>

PHP - Add this to your plugin php
<?php
add_action('admin_footer', 'my_plugin_add_button');

function my_plugin_add_button(){
echo <<<EOT
<script>/* <![CDATA[ */
var j, n,
 last = edButtons.length,
 tbar = '';

// add a new editor button as follows:
// edButtons[edButtons.length] = new edButton('BUTTON ID', 'BUTTON TEXT', 'OPENING TAG', 'CLOSING TAG', 'ACCESSKEY');
// Example: edButtons[edButtons.length] = new edButton('_h1', 'H1', '<h1>', '</h1>', -1);
edButtons[edButtons.length] = new edButton('_h1', 'h1', '<h1>', '</h1>', "h");
edButtons[edButtons.length] = new edButton('_h2', 'h2', '<h2>', '</h2>', -1);
edButtons[edButtons.length] = new edButton('_h3', 'h3', '<h3>', '</h3>', -1);
edButtons[edButtons.length] = new edButton('_h4', 'h4', '<h4>', '</h4>', -1);
edButtons[edButtons.length] = new edButton('_h5', 'h5', '<h5>', '</h5>', -1);
edButtons[edButtons.length] = new edButton('_h6', 'h6', '<h6>', '</h6>', -1);
edButtons[edButtons.length] = new edButton('_custom', '<button>', '[myplugin_short_code]', '', -1);

// Don't change anything below
// ***************************
for ( j = last; j < edButtons.length; j++) {
 n = edButtons[j];
 if (/<button>/g.test(n.display)) {
  // matched opening tag => add a button
  tbar += '<button id="' + n.id + '" type="button" class="ed_button" onclick="edInsertTag(edCanvas, ' + j + ');"><span></span></button>';
 } else {
  // add an input
  tbar += '<input type="button" id="' + n.id + '" accesskey="' + n.access + '" class="ed_button" onclick="edInsertTag(edCanvas,' + j + ');" value="' + n.display.replace(/\"/g,'\"') + '" />';
 }
}
document.getElementById('ed_toolbar').innerHTML += tbar;
/* ]]> */</script>
EOT;
}
?>

Sunday, March 21, 2010

How To Add A Champions Online Server Status To Your Site

Champions Online is a MMORPG made by Cryptic. You can normally find the server status by looking at the top of the page of their official site or from the launcher (from what I've read). This post will allow you to either (1) embed a Champions Online Server Status page on your site or (2) make your own page using php and XML RPC.

Embed a Server Status on your site
Adding a server status to your site, using the page I provided, is pretty simple. Just add an iframe to your page widget using this code:
<div align="center">
<iframe src="http://motty.000space.com/champions/status.php?css=co.css" allowtransparency="true" align="top" scrolling="auto" frameborder="0" height="50" width="160"></iframe>
</div>
The frame height is set to only contain the "Server Status" and "Up" or "Down". Any additional text from a notice will make the window scrollable.

I've also included a way to choose several other stylesheets or add to add your own. The default stylesheet uses images on a dark background.


To make your own stylesheet, follow this basic template (this is the default CSS)
/* Overall page */
body {
background-color: #222;
margin: 0 auto;
font-family: Verdana, Helvetica, sans-serif;
color: #ddd;
text-align: center;
}
/* wraps contents */
.wrapper {
color: #ddd;
width: 130px;
padding: 5px;
text-align: center;
margin: 0 auto;
overflow-x: hidden;
}

/* Server Status text */
.serverStatus .text {
color: #ddd;
background: url(server-status.png) no-repeat;
text-align: center;
text-indent: -9999em; /* hide text if using images */
margin: 0 auto;
height: 20px;
width: 120px;
}

/* Server Status Up or Down */
.statusUp {
color: #ddd;
background: url(server-up.png) no-repeat;
text-align: center;
text-indent: -9999em; /* hide text if using images */
margin: 0 auto;
height: 20px;
width: 40px;
}
.statusDown {
color: #ddd;
background: url(server-down.png) no-repeat;
text-align: center;
text-indent: -9999em; /* hide text if using images */
margin: 0 auto;
height: 20px;
width: 75px;
}
.notice {
color: #ddd;
font-weight: bold;
}
Then name the file something like "co.css", upload it to your server and finally, point the iframe src css variable to the file:
http://motty.000space.com/champions/status.php?css=http://mysite.com/co.css
Add Your Own Server Status
This method shows you how to add your own server status using php and XML RPC (you'll need this extension installed on your server). I barely know php and I don't know XML RPC at all, so piecing this code together took some work and help from Diamonds who works at Cryptic. I'm just posting the result of that work and to hopefully keep Diamonds from being barraged with more questions about setting up a server status.

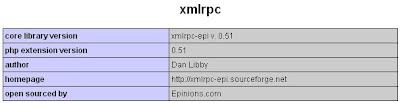
Check your phpinfo() and make sure you have the XMLRPC enabled

Here is the basic php required to obtain the server status:
# Using the XML-RPC extension to format the XML package
$request = xmlrpc_encode_request( "wgsLauncher.getServerStatus", $srvr );

$ch = curl_init();
curl_setopt($ch, CURLOPT_POSTFIELDS, $request);
curl_setopt($ch, CURLOPT_URL, "http://www.champions-online.com/xmlrpc.php");
curl_setopt($ch, CURLOPT_RETURNTRANSFER, 1);
curl_setopt($ch, CURLOPT_TIMEOUT, 1);
$result = curl_exec($ch);
curl_close($ch);

$method = null;
$params = xmlrpc_decode_request($result, &$method);

# server status result = true (up) or false (down)
$status = ($params['status']) ? 'Up' : 'Down';
$notice = ($params['notice'] == "") ? "" : "Notice: " + $params['notice'];

Saturday, September 19, 2009

MMORPG Server Status

I just started teaching myself php and figured out how to make a server status box for a couple of online games. So far I've added a server status for Aion, Lord of the Rings and Warhammer. These are free for anyone to use. I made it so you can add your own CSS and I added a few parameters to make them even more customizable!


Note: These server status boxes obtain information directly from their respective pages (see the source of the page). The information is cached every 10 minutes and hopefully that is enough to keep from aggravating the site admin and locking me out.

If you require more detailed instructions, click the appropriate link below.

Server Status Available000Space
Site
AionX
LOTRO - USX
LOTRO - EUX
WarhammerX*
WoW - USX
WoW - EUX

Update: The mirror site at motty.000space.com, well is almost a mirror site. I'm still working the bugs out of accessing the server status page for that site, so it's using the warhammer server status from heliohost.org.
Update #2: I ditched l4rge.com since it turned out to be so unreliable, sorry for the inconvenience; But I've found a newer and better hosting site with heliohost.org. The above post has been updated to reflect this information.